Zoom Tips For Beginners
Using Zoom and Getting the Links to a Meeting
Because of the pandemic, we are now relying heavily on Zoom.You can download Zoom from zoom.us for your Mac or PC. To get Zoom for your iPad or iPhone just visit the App Store. This gives you the free version. That is good enough as a participant. When there is an update Zoom will remind you. It is best to stay current.
Our meetings are currently held on the 1st, 2nd, 3rd, and 4th Tuesdays at 1:30. Occasionally we could have a special session. We send a link to our members for a Tuesday meeting via Mail Chimp on the preceding Friday around 6 PM. A reminder goes out at 11:30 AM on the day of the meeting. The link is also placed on our Forum calendar. You have to join the forum to view this calendar. The best practice is to add the event to your Calendar app. Just copy and paste in. You could find the email and click the link there too. So once you receive the invite we provide an embedded link. Once the Zoom app is installed just clock the link. Your browser opens, asks you to allow and you get in.
Getting Audio to work in Zoom
The microphone on your Mac needs permission to make audio to work in the Zoom app. Without doing so you cannot be heard or get audio. You have already installed Zoom.This is done by going into System Preferences. Then Security and Privacy. In the sidebar scroll until you see Microphone. Click there. Then on the right look until you find Zoom. Make sure it is checked. In order to check the lock in the left corner needs unlocking. This requires your password. This is the password you use to unlock your Mac.

Change your Screen Name
We really want to connect a face with a name. So here are the steps:
1 When in a meeting, click on ‘Participants’ at the bottom of your screen in the calling bar.
2 Hover the mouse pointer above your name until you see the option to select ‘More’.
3: Once you see it, click on it and select Rename.
4: Enter your desired name in the text field and click on ‘Ok’ to confirm your selection.
Chatting in Zoom
While you’re in a Zoom meeting, you can chat with other participants. You can send a group chat message or send a private message to an individual.
Zoom chat is a great way to share links, clarify something said on the video call or post lists or large blocks of text. Zoom chat is available unless the host has disabled the function for the meeting.
- Click Chat in the meeting controls bar at the bottom of the client. The chat window will open on the right.
- Type a message into the chat box or click on the drop down next to “To:” if you want to message a specific person.
- When new chat messages are sent, a preview of the message will appear and the Chat button will flash orange. Click the button to view the chat window.
Sharing Files in Chat
Sharing Files is a feature in Chat. For the most part our members might share a file on their computer. In Chat there is a button called Files.
Just specify where the file come from. It can be sent to everyone or specific participants. It can be formats such a Pages document, a PDF, JPG, a Word document

Screen Sharing Setup Mac
A great thing about Zoom is screen sharing. We can demo things more easily. As a participant in a Help session sometimes this can really let us see what is going on.
But it isn’t just clicking that little green tab. The Host needs to give you permission. Doing this is a one time setting per device.You should to do on both a Mac and iOS device.
The graphics explains it pretty well.
On the Mac go into System Preferences >Security and Privacy
1 Click on the Privacy tab
2 Click on the lock icon, when prompted enter your password for your computer.
3 On the left side go to Screen Recording.
4 Zoom will be listed provided you installed the Zoom app. Put a check mark in the box. Relock, close out of System Preferences.
iPad and iPhone Screen Sharing
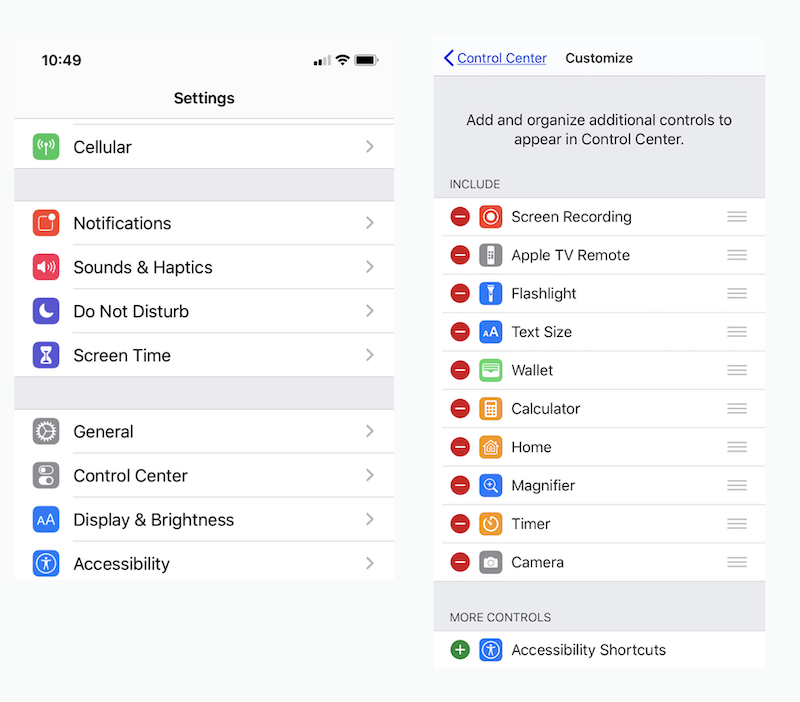
Go to Settings > Control Center > Customize Controls ….Click.
Add Screen Recording if not Selected. If not there it is in More Controls just below:
Sharing a Desktop or iPad Screen
Once you have completed the steps described earlier to screen share in the System Preferences on your Mac or Settings in Control Center on your iPhone or iPad. This must be done in advance. Not on the fly during a Zoom meeting.
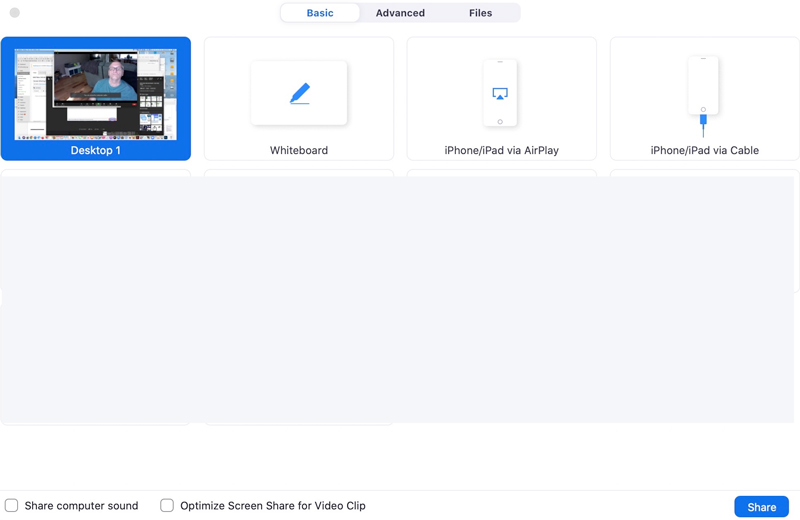
Under the Basic tab are Desktop1, Whiteboard, iPhone or iPad via Airplay, and iPhone /iPad via Cable. So you can share your desktop screen from your computer. Not too many of us have actually done much with the Whiteboard in the TVAUG meeting setting. Then the next 2 are interesting. Both share the same screen. I recommend connecting the lightning cable as Airplay can drop its signal. Just focus on the first row of 4 icons. In this case Desktop 1 is selected. Note the blue highlight. Once selected click Share. It will take a few seconds. If you plan on sharing have that desktop or iPad screen ready to go. Load what you want to share in advance. On a desktop hide unneeded clutter. Tidy up.

Advanced Screen Sharing Features

The second tab reveals Advanced screen sharing features. The Slides as a Virtual background is interesting. WE can take our Keynote or Powerpoint slides and Export them as a PDF. Then we can advance the slides in the PDF as we talk about the content. It uses your video in Zoom. The video image can be resized or moved as you would like.
I haven’t tried portion of the screen . But it just focuses on the highlighted area. Nor have I tried much with a second camera. More details later…
